CaptureUX is PC-based software that can be used to record a usability test of any kind of product. That's a bold statement, but we are pretty sure that with careful selection of USB video hardware you can use CaptureUX to record video of participants working with your product sufficient to convey participant feedback to your product development stakeholders.
With CaptureUX, you can:
Record participants in MP4 format.
Annotate recordings in real time or post-test.
Create stand-alone video highlights for use in websites and presentations.
Generate lists of research findings/results (Version 2.0.)
Publish HTML-based reports with annotations, findings, and links to MP4 video.
Use Cases
A: Participant Working on Their Own Computer
This use case pertains to an onsite participant who will be evaluating software, a website, or some other artifact that you are presenting on a computer.
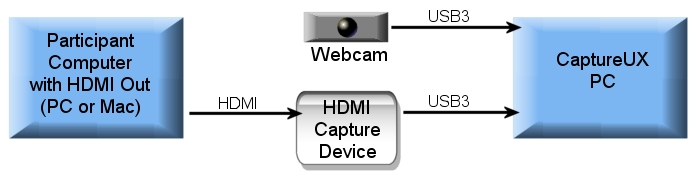
Set up is simple. The participant works on their own computer (PC or Mac) and a USB camera connected to the CaptureUX PC captures their facial expressions and voice.
Sample Video
Setup Schematic
Show detailed step-by-step setup instructions.
You will need two laptops: one for the participant and one for CaptureUX.
To record the participant's computer screen:
Connect an HDMI capture device to the CaptureUX PC. (See the Resources section for recommended hardware.)
If the participant is working on a laptop, simply connect the HDMI output from the participant’s computer (PC or Mac) to the HDMI capture device, just like you would connect a projector.
To record the participant's facial expressions:
Connect an external USB webcam to the CaptureUX PC. (See the Resources section for recommended hardware.)
Open CaptureUX.
Configure CaptureUX to record in Two Mixed Sources mode using the HDMI capture device for the participant’s PC screen, the external webcam for the participant’s face, and the external webcam microphone as the audio device.
Verify setup and start recording.
Have the participant begin scenario 1 on their PC. Their screen will be recorded via the HDMI capture device, their face will be recorded via the webcam, and their voice will be captured by the webcam’s microphone.
You can take notes in real time using your CaptureUX PC.
When the participant is done, click Stop Recording in CaptureUX.
When your research is complete, you can edit notes you made in real time, add additional notes, create video highlights, compile a list of findings, and export an HTML report.
B: Participant Actions Recorded with Two Cameras
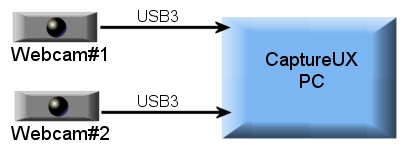
This use case pertains to an onsite participant who will be working with physical artifacts, i.e., something other than software. Simply connect two USB cameras to the CaptureUX PC.
Sample Video
Setup Schematic
Show detailed step-by-step setup instructions.
You will only need the CaptureUX PC.
Connect two USB webcams to the CaptureUX PC. (See the Resources section for recommended hardware.)
Open CaptureUX.
Configure CaptureUX to record using the two USB cameras in Two Mixed Sources mode and use the microphone of one of the USB cameras as the audio source.
Verify setup and start recording
Have the participant begin scenario 1. Their actions will be recorded via the two USB cameras and their voice will be captured by the microphone on one of the cameras.
You can take notes in real time using the CaptureUX PC.
When the participant is done, click Stop Recording in CaptureUX.
When your research is complete, you can edit notes you made in real time, add additional notes, create video highlights, compile a list of findings, and export an HTML report.
C: Remote Participant via Meeting Service Like Zoom or Webex
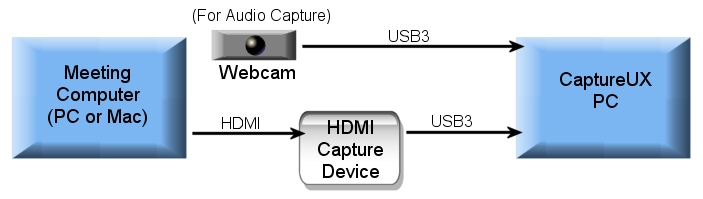
To involve a remote participant, use a second computer to host an online meeting like Webex or Zoom. Then record that computer just like you would in the onsite participant setup. Use a USB camera connected to the CaptureUX PC as a microphone to record the audio from the second computer (which will be the online meeting audio.)
Sample Video
Setup Schematic
Show detailed step-by-step setup instructions.
You will need two computers: one for the meeting and one for CaptureUX.
Set up the CaptureUX PC to record the meeting computer's video:
Connect an HDMI capture device to the CaptureUX PC. (See the Resources section for recommended hardware.).
If the meeting computer is a laptop, simply connect the HDMI output from the meeting computer (PC or Mac) to the HDMI capture device, just like you would connect a projector.
To record the meeting audio:
Connect an external USB webcam to the CaptureUX PC. This webcam will be used only for its microphone. (See the Resources section for recommended hardware.)
Place the webcam near the meeting computer's speakers.
Configure CaptureUX to record in Single Source mode using the HDMI capture device for the participant’s PC screen and the external webcam microphone as the audio device.
Set up the meeting computer to display the meeting and play meeting audio using its speakers.
Verify setup and start recording.
The screen of the meeting computer will be recorded via the HDMI capture device and meeting audio will be recorded using the webcam microphone.
You can take notes in real time using your CaptureUX PC.
When the session is done, click Stop Recording in CaptureUX.
When your research is complete, you can edit notes you made in real time, add additional notes, create video highlights, compile a list of findings, and export an HTML report.
Pricing
Single-Seat License is $900.00 per year plus tax where applicable. License is required to enable CaptureUX functionality.
Technical Support is $300.00 per year per Single-Seat License plus tax where applicable. If Technical Support is purchased after initiating a Single-Seat License, cost is $300.00 with the Technical Support term expiring with the Single-Seat License. For companies with multiple CaptureUX licenses, all Single-Seat Licenses must have Technical Support if Technical Support is desired.
If you would like to purchase CaptureUX, please Contact Us.
Contact Us
How May We Help You?
CaptureUX is for professionals involved in product development, so please provide contact information that will indicate to us that you are such a professional. We will email you a link to download the CaptureUX demo software after you complete and submit the form below.
To inquire about CaptureUX, please complete and submit the form below and someone will contact you by phone or email, whichever you prefer.
To purchase CaptureUX, please complete and submit the order form below. We will email you a .PDF invoice with a link for credit card payment. We are also happy to work through your company's purchase order (PO) process.
Request CaptureUX Demo Software Download by completing a Contact Us form with your contact information.
CaptureUX PC System Requirements: For best results, the following minimum system requirements are recommended. Ovo Studios makes no claims about performance of systems that do not meet these minimum specifications.
Microsoft Windows 10
Intel Core i7 or Core i5 with integrated graphics and Intel QuickSync Technology. Intel QuickSync Technology is vitally important. To see if your PC's Intel CPU has QuickSync, you can search by processor type on Intel's Product Specifications site ➚.
6 GB RAM
32 GB hard drive space per 8-hour study, 7600 RPM drive.
In real-world testing, Windows PCs with lesser capabilities have been shown to work. You can test your system by Requesting CaptureUX Demo Software Download and seeing if it works.
Macintosh is not supported natively, though Bootcamp should work. If you would like to test your Mac system running Bootcamp, please Request CaptureUX Demo Software Download and see if it runs on your system.
Hardware Recommendations for USB Devices: Manufacturers frequently update their hardware, but as of 2020, here are our recommendations for USB hardware.
For an HDMI Capture Device, we recommend the Magewell USB Capture HDMI Plus because of its driver-free installation on Windows 10 Professional and its on-board HDMI Out which permits you to connect an optional second display. This HDMI Capture Device may be used to capture the following video:
1080P video output from a PC or a Mac computer.
1080P video from an Apple Lightning Digital AV adapter connected to an iPhone or iPad.
1080P video from an Apple TV which could be used to AirPlay iOS video from an iPhone or iPad.
For a USB webcam we recommend the Logitech C922 Pro Stream Webcam which is recommended for the following purposes and reasons.
You could use this camera to record live-action video.
You could use this camera as a microphone as in use case C's webmeeting setup.
This camera comes with a tripod which is handy for tabletop setup.
This camera works with the latest Logitech Capture application which can be used to control the camera's behavior (e.g., turning off autofocus, zooming.)
For a USB webcam for mobile device testing, we recommend the IPEVO V4K Ultra High Definition 8MP USB Document Camera. The IPEVO "Visualizer" freeware software is required to throttle the camera's output to lower resolution for smooth video on all PC systems we have tested.
A previous recommendation for a USB webcam was the Logitech C920. This camera still works great with CaptureUX, but does not seem to be compatible with the latest Logitech Capture software. This is not a problem if you (a) can use a previous version of Logitech's software to control camera settings, or (b) do not want to control camera settings.